Part Two: Getting Started
In this installment, you will learn the basic steps of making a functional icon file and actually build your first icon in ResEdit! Now, there are several good icon editors out there - and we will discuss those in later column - but for our purposes in this installment, we'll use ResEdit, Apple's venerable resource editor.
(btw - I make all my icons at the Iconfactory in ResEdit)
ResEdit is a powerful tool, and you may have heard the warnings about how the misuse of it can really screw up your computer, but don't worry - this lesson will not endanger your precious hard drive in any way! ResEdit is freeware and the latest version is 2.1.3. It is no longer updated by Apple, but it is small, compact and very stable - and a basic knowledge of how it works will make you a confident icon artist! If you don't already have it, you can download the latest version right from Apple at the URL to the right.
One last point before we start: while it is quite simple to copy and paste a picture or pict clipping into an icon editor, this doesn't always look that great, and it doesn't always make a good icon. A good picture of a dog is not automatically a good icon of a dog. To really shine as an icon artist, it will be very helpful to be able draw your own designs. We will explore this more down the road, but for now let's just attempt a simple drawing task - one that anyone can handle!
What should I draw?
You can probably think of a lot of subjects you'd like to have custom icons for, but a good way to get discouraged is to take on too much, too early. Let's pick a subject that is popular, fun, useful and easy to draw - an iMac! It has a simple geometric form (at least from the angle we will use) and you can easily make the color variations once you have the basic icon. You may be reading this on an iMac, and this article is certainly being written on one!
We'll use a face-on view, looking directly at the front of the computer. This will make everything roughly rectangular and quite easy to draw.
Opening ResEdit/Making a Resource
Launch ResEdit by double-clicking on its icon. You will be presented with a splash screen Click on the graphic to reach the navigation window that gives you the option to make a new file. Chose the "New" button and name your file "Tutorial". You will now see a small blank window titled "Tutorial". This means there is now a ResEdit file that contains no resources, so let's add one. From the "Resource" Menu, choose "Create New Resource". This will bring up a small screen that lets you choose a File Creator Type (Fig. 1). Scroll down to "icl8", which means literally
"icon->large->8bit".
After creating the icl8 resource, you need double-click it to open the first window, then select "Get Resource Info" from the Resource menu and give it the ID "-16455".
Now click again on the "-16455" resource and you will automatically be kicked into the ResEdit Icon Editor, a mini-image editor with simple tools. This is what it looks like.
Let's Draw!
From here on out, it is very easy. The big empty window is your Image Editor. The smaller windows to the right are the different Resource Preview Windows. They are grayed-out because they aren't actually there yet! Click on the small square window for "icl8". You are now ready to draw your icon. Use the Rectangle Outline tool (Fig. 2) to start making the outlines of the iMac.
If you don't even want to draw just now, you can simply copy the graphic at the right (Fig. 3) and paste it into the Editor Window, but please take the time to try to draw it. It can be a lot of fun! Use the Eraser if you make mistakes, or double-click with the Pencil. ResEdit isn't fancy, but it's very fast!
Almost Done...
You're doing well ... almost done! You should now have a graphic in the Editor Window that looks like this.
The Mask!
At this point, regardless of how much you color your icon later on, the Mask can be made right now by simply dragging, since the outline of the icon won't change! Move your cursor over the small Preview Window until the cursor arrow changes to a "grabbing hand". Click to grab the icon and drag it into the bottom-most window, the Mask Preview Window. As simple as that, you now have a mask for your icon!
Ebony & Ivory?
At this point, your icon may look too plain for your taste, so have a little fun with adding colors! You can go one pixel at a time with the Pencil, or use the Paint Bucket tool. Select colors from the color palette. See the little overlapping rectangles at the bottom left of the window? That's your foreground/background color selector. Notice how it changes depending on which resource you are editing? Those are the colors available at that bit-depth. You can also "tear off" this menu, in case you want it to be always open and available.
Finishing Up!
To finish up the icon, do the same thing for all the preview windows, clicking and dragging the icl8 resource into the other windows in turn, including the small ones on the right. Notice how ResEdit automatically reduces the size? The results certainly aren't perfect, but we'll go back and fix that next time.
Before closing the file completely, select "Get Info for ____" from the File menu and make sure the "Use Custom Icon" checkbox in the lower right is checked. This will allow the Finder to display your new icon on the ResEdit file instead of the generic ResEdit icon.
To finish working with the icon file, just close all the open windows and when ResEdit asks you if you want to save the changes, click Yes. Notice that the ResEdit file on your desktop bears the artwork you just drew!
Congratulations! You've just made your first icon! You can use it to copy and paste in the the Finder's Get Info box just like any other icon , or use it in IconDropper by making your own Pack.
But we're getting ahead of ourselves...
Next month, we find out what Mies Van de Rohe was talking about in: Part Three: Details, Details!
|
|
 |
| A step-by-step guide |

Download ResEdit 2.1.3
You can get it at Apple's Software Updates
page, and typing "ResEdit" in Search Window 1.
Fig. 1: Resource Type Selection Menu
 Choose "icl8". Choose "icl8".
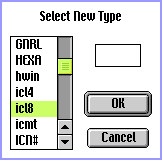
Fig. 2: The Rectangle Outline Tool
These are all fairly basic and self-explanatory
drawing tools. For this lesson, we only need the
Rect Tool, Paint Bucket and the Pencil.
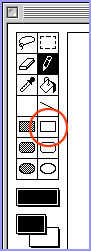
Fig. 3: iMac Graphic Shortcut
If you don't want to draw the icon, you may copy
paste the graphic below into the Editor Window.
Simply click and hold on the image and select
"Copy this image.."
However, drawing it could be more fun!

|
|