core
filters
tips
contact
download
webmaster tour top

Web Posterize
When you've been designing websites for more than 15 minutes, you know that WYS is never WYG. What's glorious on your monitor may be ghastly on someone else's.
If you've spent hours transferring graphics across platforms to verify their quality, have we got a filter for you!
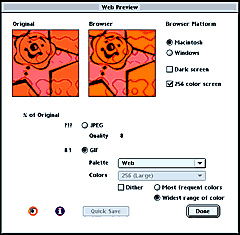
Furbo's Browser Preview shows you exactly how your image will look as a GIF or JPEG, in millions of colors or 256, on Macintosh or Windows – all before you save the image in a web-
Finally, you can spot problems and compensate for them before committing yourself. Now if only you could do the same thing with relationships.
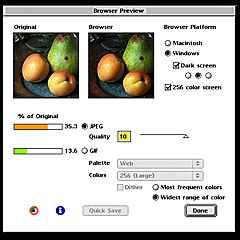
Previews
On the left you see your image in its present state; at right, a realtime preview of the final image as it will be seen by your website's visitors. It's like those "Before and After" weight loss ads – except, here, "Before" is better looking.
Preview your image as a GIF or JPEG, as seen on Mac or Windows, with plenty of VRAM or very little. Find your worst case scenarios and compensate directly in Photoshop.
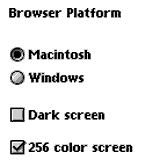
Browser Selection
Controls to the right of the browser preview allow you to check many different browser configurations, without leaving the safety of your Mac, or adjusting a single display setting. Included is a "Dark Screen" control. As a Mac user, you may be unaware that a Windows PC lacks gamma correction. Without getting into gory details, this makes your image appear darker on PC. How much darker? Sometimes a lot, sometimes a little. The three radio buttons let you view your image on three hypothetical PC monitors.
Bar Graphs
These show you how much the original was compressed. With heavy compression, bars are drawn in green (good thing). With light compression, the bars are red (bad thing). Yellow is used to indicate a value in between the two.
If you move the preview to another part of the selection, the bar graphs will reset. Switch to a different graphics format, and the graphs will be recalculated.
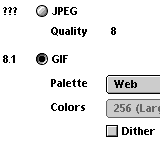
JPEG Controls
Click on the JPEG radio button, and two things happen: first, the image is compressed and displayed in the browser window. Then a graph showing the amount of compression is displayed.
You can vary the amount of compression to see how much you can get away with. The lowest value (zero) gives you a tiny but hideous end graphic. Photoshop defaults to a setting of 8. You can often get acceptable results with values between 3 and 5. Experiment and see!
GIF Controls
As with the JPEG radio button, the gif controls compress the image and display it in the browser window, along with a bar graph. You can adjust your palette, colors and dithering.
Palette settings let you choose the colors that will be used in your final image. The "colors" setting determines how large your final file will be. (Fewer colors equals smaller files.) Change this number at any time, and the bar graph will update automatically.
The dithering control is especially useful. While dithering often makes your files look nicer, they also increase in size. Watch the graph to see how much.